Uploading a video to YouTube feels like sharing a moment with the world. But if you aren't careful, you are also handing over a digital map of your life. A single frame can reveal your home address through a mailbox or a street sign. Your phone might have embedded GPS coordinates into the file itself. Even your voice can be identified by AI tools that analyze pitch and cadence.
Anonymizing footage is not just about slapping a pixelated box over a face. It requires a systematic approach covering visual identifiers, audio leaks, and hidden file data. This guide breaks down exactly how to scrub every trace of personal information from your videos before they hit the public internet.
The Threat Model: What Actually Identifies You?
Most people think anonymity means hiding their face. While facial recognition is a major concern, it is only one piece of the puzzle. To truly protect yourself, you need to understand what constitutes an identifier in the eyes of a viewer-or a data scraper.
Direct identifiers include faces, license plates, and spoken names. These are obvious targets for blurring and redaction. However, indirect identifiers are often more dangerous because they are harder to spot. Your body shape, distinctive clothing, tattoos, or even the way you walk can make you recognizable to acquaintances. Background details are equally revealing. A unique piece of furniture, a view out a window, or a specific landmark can triangulate your location instantly.
Audio is another massive leak point. Voices are biometric data. If you speak in your video, listeners can identify you even if you never appear on camera. Furthermore, mentioning specific locations, schools, or workplace names in conversation provides context clues that can link the video back to you.
Finally, there is the invisible layer: metadata. Modern cameras and smartphones embed Exif data into video files. This includes the exact time and date of recording, the make and model of the device used, and crucially, GPS coordinates showing where the video was filmed. Unless this data is stripped, anyone who downloads your video can see exactly where you were standing when you hit record.
Capture-Time Anonymization: Preventing Leaks at the Source
The best way to anonymize a video is to prevent identifying information from being recorded in the first place. Post-production fixes can fail, but smart filming techniques create a safety net that works even if the raw footage is leaked.
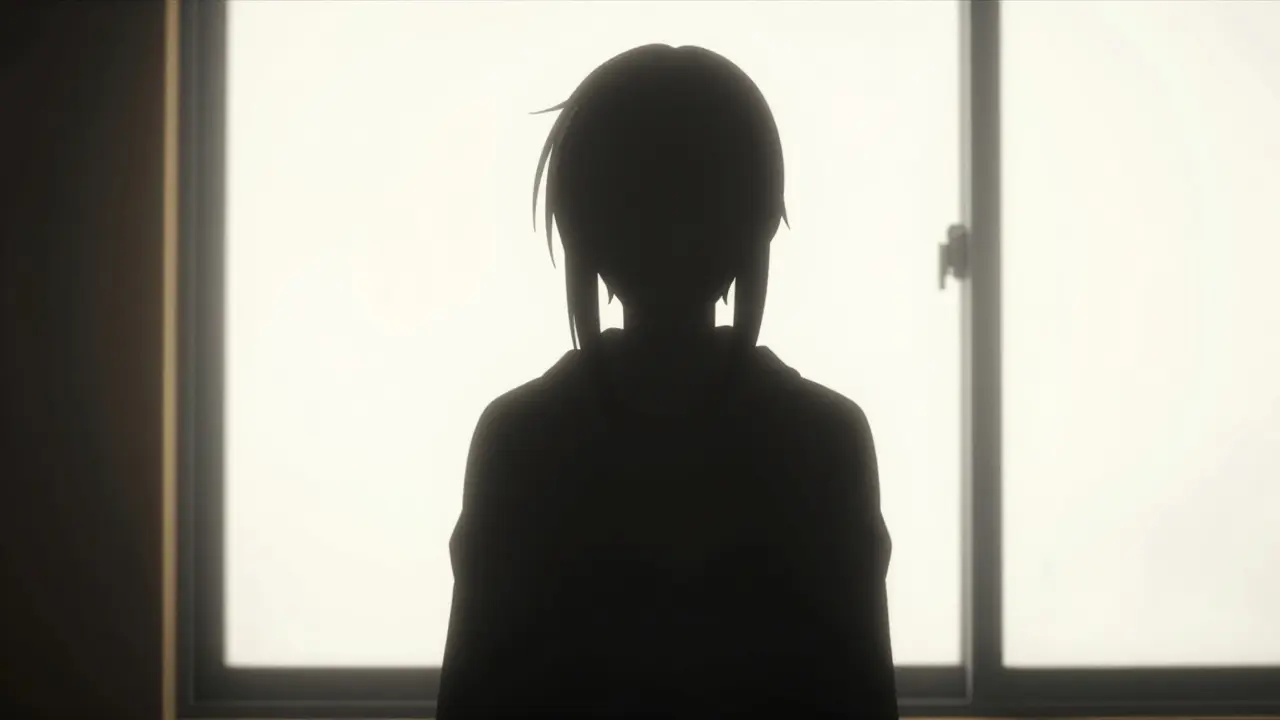
Lighting is your most powerful tool here. Silhouette lighting is a classic technique used in journalism. Place your subject in front of a brightly lit background-like a window during the day-and lock the camera's exposure to that bright area. The result is a dark, featureless outline of the person. Just ensure there is no light hitting the subject's face directly. If the camera auto-exposes, it will try to brighten the dark figure, potentially revealing facial details.
If silhouettes feel too dramatic, try shooting shadows. Cast a shadow against a wall using side lighting. Shadows obscure fine facial features while still conveying movement and expression. Alternatively, film the subject facing away from the camera, or use physical barriers like semi-translucent drapery backlit to diffuse features.
Disguises work well too. A hat, sunglasses, or a wig can break up distinctive hairlines and facial structures. For environmental privacy, consciously frame your shots to exclude your home's exterior, mailboxes with addresses, or unique neighborhood landmarks. Avoid showing children's faces entirely, as their images can be permanently indexed online.
Post-Production Visual Redaction
When capture-time methods aren't enough, you need to edit the footage. This involves masking and blurring sensitive areas. Professional editors often use software like DaVinci Resolve for this task.
In DaVinci Resolve, you would move to the Fusion page to draw masks around faces or license plates. You then track these masks across the timeline so they follow the subject's movement frame by frame. Once tracked, apply a blur effect with a high radius until details are unrecognizable. This process is manual and time-consuming, requiring you to review every second of footage to ensure no slip-ups occur.
For creators who don't want to install heavy desktop software, browser-based tools offer a faster alternative. Services like BGBlur allow you to upload MP4, MOV, AVI, or MKV files directly in your web browser. They automatically detect faces and apply anonymization effects. You can preview the result and export an HD file without needing to learn complex node-based editing. Similarly, platforms like Blurit focus on automated redaction for entertainment and media, detecting both faces and license plates to streamline the workflow.
Remember that simple blurring isn't always foolproof. Determined users with image enhancement software might attempt to reverse basic filters. Layering multiple distortion effects or using strong pixelation adds an extra margin of safety.
Audio Anonymization: Hiding Your Voice
A clear voice is a fingerprint. If you are speaking in the video, you must alter the audio track. Simply lowering the volume isn't enough; you need to change the timbre and content.
Pitch shifting is the standard method. In audio editors like Audacity or the Fairlight module in DaVinci Resolve, you can shift the pitch of the voice up or down. Shifting by two semitones is usually sufficient to make the voice less recognizable while keeping it intelligible. However, advanced AI tools can sometimes reverse simple pitch shifts. For better protection, combine pitch shifting with other distortions, such as adding reverb or changing the tempo slightly.
You also need to edit the content. Go through the waveform and cut out any segments where you mention names, locations, or specific dates. Zoom into the audio track, select the precise segment containing the sensitive word, and delete it. Smooth out the silence left behind to avoid awkward pauses that signal something was removed.
If the voice is central to the video, consider replacing it entirely with text overlays or hiring a voice actor to read a script based on your original dialogue. This ensures zero biometric data remains in the audio stream.
Stripping Video Metadata
This is the step most creators skip. Even if your video looks anonymous, the file itself might tell a different story. Smartphones and digital cameras embed metadata into video containers (MP4 or MOV). This data includes GPS coordinates, creation timestamps, and device serial numbers.
Imagine uploading a vlog of a park. Visually, it's generic. But if the metadata contains GPS tags, anyone downloading the file can pinpoint the exact park, and cross-referencing the timestamp with social media posts could reveal who else was there.
To fix this, you need a metadata remover. Many online tools claim to clean files, but they require you to upload your video to their servers. This defeats the purpose of privacy-you're sending your private footage to a third party just to clean it. Plus, uploading large video files takes time and bandwidth.
A safer approach is client-side processing. Tools like Vaulternal's video metadata remover run entirely in your browser using WebAssembly. Your file never leaves your device. It strips the GPS atoms, camera info, and copyright tags from the container without re-encoding the video stream. This means the process is fast, lossless, and secure. You get a clean file ready for upload, with no risk of server-side leakage.
YouTube Account and Upload Privacy
Technical anonymization of the file is useless if your account profile gives you away. When setting up your YouTube channel, do not use your real name. Create a pseudonymous username that has no connection to your offline identity. Avoid linking your Google account to any services that might reveal your true name or email address in public profiles.
Be cautious with video settings. If the video contains sensitive material involving family members or minors, set the visibility to "Private" rather than "Public" or "Unlisted." Private videos can only be viewed by specific email addresses you invite, keeping them off search engines and recommendation algorithms.
Also, check your comments section. Disable comments entirely if you cannot moderate them, or enable strict filtering. Sometimes viewers will comment with identifying information about you or your location, which becomes part of the public record associated with your video.
Review and Final Checks
Before hitting publish, perform a final review. Watch the entire video with sound off, looking for missed faces, license plates, or background details. Then watch it with sound on, listening for accidental slips of names or locations. Open the file properties on your computer to verify that metadata has been stripped.
Anonymity is a spectrum, not a binary switch. No method is 100% guaranteed against state-level adversaries, but for protecting your privacy from the general public and data scrapers, this multi-layered approach significantly reduces your digital footprint. By combining careful filming, thorough post-production, and clean file handling, you retain control over your narrative without sacrificing your security.
Does YouTube strip metadata from uploaded videos?
YouTube processes videos heavily for streaming optimization, which often alters or removes some metadata. However, relying on YouTube to sanitize your file is risky. The platform may retain certain data for internal purposes, and if someone downloads your video via third-party tools, the original metadata might persist depending on how the download was handled. It is safest to strip metadata locally before uploading.
Can blurred faces be unblurred?
Simple Gaussian blurs can sometimes be partially reversed using AI deblurring tools, especially if the blur radius is small. To prevent this, use stronger pixelation or mosaic effects rather than soft blurs. Additionally, applying multiple layers of distortion makes reversal computationally difficult and visually noisy, ensuring the identity remains protected.
Is it safe to use online video anonymizers?
Many online tools require you to upload your video to their servers for processing. This poses a privacy risk because the company hosting the service has access to your raw footage. For maximum security, use client-side tools that process files locally in your browser, ensuring your video never leaves your device.
How much should I shift my voice pitch?
Shifting your voice pitch by two semitones up or down is generally effective for casual anonymity. It changes the vocal timbre enough to confuse human listeners and basic voice recognition software. For higher security, combine pitch shifting with other effects like reverb or tempo changes to further obscure biometric characteristics.
What is silhouette lighting?
Silhouette lighting is a cinematography technique where the subject is placed between the camera and a bright light source. By locking the camera's exposure to the bright background, the subject appears as a dark outline with no visible facial features. This is an effective capture-time method for maintaining anonymity without post-production editing.


Lee Paige
June 8, 2026 AT 18:01 PMIt is laughable that we are still discussing privacy on a platform owned by the very surveillance apparatus designed to harvest our data. The article suggests 'anonymizing' footage as if you can hide from the algorithmic gaze of Big Tech and the state simultaneously. You strip the metadata, but they have your IP, your login history, your purchase patterns, and your biometric data from other sources. The concept of anonymity on YouTube is a myth sold to pacify the masses while the dragnet tightens. Do not be fooled into thinking a blurred face protects you from the panopticon.
aaliyah zahid
June 9, 2026 AT 04:35 AMI find it fascinating how people are so paranoid about their mailboxes being visible in videos. It seems like a lot of effort for zero gain. If you are worried about your location, maybe just don't film outside your house? Or better yet, enjoy the community aspect of sharing your life without trying to cloak yourself in digital shadows. We are all connected here, and hiding makes us look suspicious rather than safe.
Sylvia Mossman
June 11, 2026 AT 01:17 AMOh, great advice. Let me get my pitch shifter and my silhouette lighting kit ready because apparently, I am now a spy in my own living room. This is exactly why nobody wants to watch amateur content anymore; it's all so sterile and calculated. Just post the video already. If someone recognizes me, good riddance. I don't have anything to hide, unlike the authors of these clickbait guides who profit from fear-mongering.
dan kaffeman
June 11, 2026 AT 07:43 AMThis entire premise is weak sauce for cowards. Real men do not hide their faces or alter their voices. If you cannot stand in the light and speak your truth with your real name and face, then you are contributing nothing of value to society. Anonymity is for criminals and liars. Stop coddling the weak and start building character. Your voice is your signature; change it and you lose your soul.
Meg Gran
June 12, 2026 AT 02:48 AMi mean... its kinda deep when u think about it. like, what is identity anyway? if i blur my face, am i still me? or am i just a ghost in the machine? the metadata part is scary tho. gps coords everywhere. we are all just dots on a map waiting to be harvested. but also, who has time to edit every frame? lol. sounds exhausting. maybe we should just live in caves instead of uploading vlogs. 🤔
Mark Corpuz
June 14, 2026 AT 01:43 AMThe section on client-side processing for metadata removal is particularly insightful. Relying on third-party servers to sanitize private files introduces an unnecessary vector for data leakage. Using WebAssembly-based tools ensures that the file never leaves the local environment, which is a critical distinction for anyone serious about operational security. Many users overlook this nuance, assuming that any online tool provides equivalent protection, but the architecture of the solution dictates its efficacy.
Erik Kirana
June 14, 2026 AT 19:38 PMYou missed the most important part! 😡 You need to scrub your soul too! 🧹 Just kidding, but seriously, this guide is lazy. It doesn't mention how to remove your aura from the cloud. Also, DaVinci Resolve is overrated. Use Adobe or cry about it. And stop using those browser tools, they are slow and stupid. Do it manually or go home. 🙄
Yogendra Dwivedi
June 16, 2026 AT 07:49 AMThis is a very comprehensive guide. In India, we are increasingly aware of digital footprints, especially with new data laws coming into play. The tip about silhouette lighting is clever and easy to implement without expensive gear. I appreciate the emphasis on preventing leaks at the source rather than just fixing them later. It saves a lot of headache during editing. Thank you for sharing this practical approach.
Steven Jacobowitz
June 17, 2026 AT 06:51 AMI've tried BGBlur before and it's decent for quick jobs, but the tracking often slips if there's rapid movement. For high-stakes anonymity, manual masking in Fusion is the only way to guarantee no slip-ups. The jargon-heavy explanation of node-based editing might scare off beginners, but it's necessary complexity. You can't have true security with automated shortcuts. Invest the time to learn the software properly.
Alexis Abster
June 17, 2026 AT 11:05 AMWow, this really opened my eyes! I had no idea my phone was tagging my exact location in every video I took. That feels like a violation of trust. I'm going to immediately check my settings and start using some of these techniques. It's empowering to know I can take back control of my narrative. Thank you for making this accessible!
Brad Ranks
June 19, 2026 AT 07:09 AMI spent three hours blurring license plates yesterday. Three. Hours. My eyes hurt. My back hurts. And then I realized I forgot to blur the reflection in the car window. So I started over. This isn't a hobby, it's a full-time job disguised as content creation. Why do we do this to ourselves? Because the internet demands perfection and privacy is optional? I miss the days of camcorders and VHS tapes where nobody could zoom in on my pores.
Karthikeyan S
June 20, 2026 AT 04:35 AMbro this is basic stuff. everyone knows this. why are you writing a novel about it? 🚩 also vaulternal is sketchy. dont trust random websites with ur vids. just delete youtube. end of story. 🗑️
Dinesh Pattigilli
June 20, 2026 AT 19:27 PMAmateur hour. The average joe thinks a pixelated box is enough. Please. With modern AI deblurring, your face is exposed within seconds. You need military-grade encryption and steganography if you want to actually hide. This article is for children playing at being spies. Real operators don't upload to YouTube at all. They use darknet mirrors. Wake up sheeple.
Madhu Menon
June 20, 2026 AT 21:47 PMThere is a profound philosophical question here about the nature of visibility. When we anonymize ourselves, do we cease to exist as social beings? The shadow self vs the public self. I prefer to remain visible, flaws and all. But I respect those who choose the path of the shadow. It is a valid choice in an age of hyper-surveillance. 🌑
Narendra Kulkarni
June 22, 2026 AT 18:08 PMThanks for the tips! I was worried about my kids' faces showing up in family vlogs. This gives me peace of mind. I will try the silhouette trick next time we go to the park. Hope it works well for us. 👍
Caitlin Donahue
June 23, 2026 AT 03:26 AMi totally agree with the metadata part. its crazy how much info is hidden in files. i used a tool once and it stripped everything instantly. super helpful. thanks for sharing this info! its nice to feel safe online. :)
Matthew Malone
June 24, 2026 AT 18:45 PMThis is precisely the kind of liberal guilt-tripping that undermines national security. By teaching citizens to evade identification, you are fostering a culture of secrecy that benefits terrorists and dissidents. True patriots have nothing to hide. If your activities are lawful, you should welcome scrutiny. This guide is essentially a manual for evading law enforcement. It is unpatriotic and dangerous to distribute such information under the guise of 'privacy.'
Alexander DeVries
June 24, 2026 AT 19:37 PMLet's channel this energy into positive action! Instead of fearing the camera, let's master it. Privacy is a right, not a privilege, and knowing how to protect yourself is a skill worth developing. Don't let the haters get you down. Keep creating, keep learning, and stay safe out there. You've got this! 💪